Foot reflexology chart is one of those posters that makes more sense once you see it on paper. It maps pressure points across both feet, with names like Solar Plexus, Liver and Sciatic Nerve sitting next to the heel, arch and toes. The idea behind it is simple to follow. Different areas of the foot link to different parts of the body on the map, and pressing those areas gently is a way to relax at the end of the day. This guide walks through the map from SoftoTech Print Studio, point by point, and then pairs it with a 16 step self massage routine you can do at home with nothing but your own hands and a chair.
I first came across reflexology the way most people do, through tired feet. After a long day of standing or walking, the feet feel heavy, the arches ache, and anything that involves sitting down and giving them a few minutes of attention sounds good. A chart helps because it turns that vague idea of a foot rub into something you can follow. You can see where the ball of the foot sits, where the arch runs, and which spots the map names. You do not need any training to use it as a relaxation routine, and you do not need any equipment beyond a comfortable seat and a few quiet minutes.
One thing to be clear about from the start. Reflexology is a relaxation and self care practice, and this guide makes no treatment claim for any condition. The chart is a map for a calming routine, not a diagnosis tool, and the massage steps are gentle self care for tired feet. If you have a foot injury, diabetes, poor circulation, or anything that makes your feet sore in a way that worries you, check with your doctor before starting a new routine. This guide walks through the pressure points on the map, explains how the 16 step routine works, sets out a few practical tips for doing it at home, and finishes with a worked session that follows the routine step by step. For more gentle movement for the lower body, our ankle strengthening exercises for seniors guide pairs well with this one.
In this guide:
- What the Foot Reflexology Chart Shows
- How to Read the Pressure Points
- Using the Chart at Home
- Worked Example: A 16 Step Foot Massage Session
- Frequently Asked Questions
The printable from this guide
Foot Reflexology Map Printable
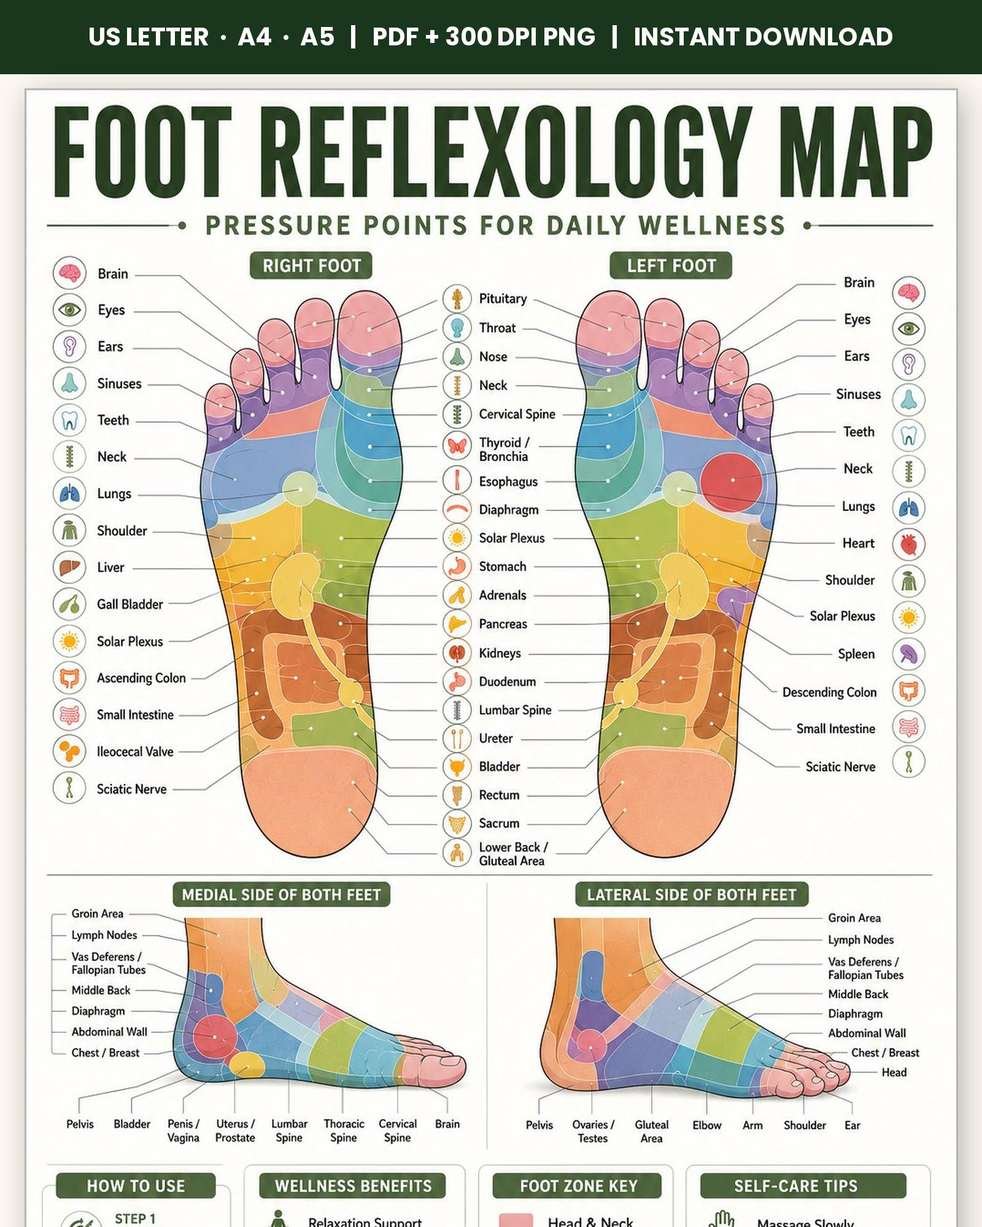
- A foot reflexology map with pressure points for daily wellness, labelled on both feet
- Right foot points include Brain, Eyes, Ears, Sinuses, Teeth, Neck, Lungs, Shoulder, Liver, Gall Bladder, Solar Plexus, Ascending Colon, Small Intestine, Ileocecal Valve and Sciatic Nerve
- Left foot points include Brain, Eyes, Ears, Sinuses, Teeth, Neck, Lungs, Heart, Shoulder, Solar Plexus, Spleen, Descending Colon, Small Intestine and Sciatic Nerve
- Centre points shared by both feet include Pituitary, Throat, Nose, Cervical Spine, Thyroid and Bronchia, Esophagus, Diaphragm, Stomach, Adrenals, Pancreas, Kidneys, Duodenum, Lumbar Spine, Ureter, Bladder, Rectum, Sacrum and Lower Back
- Print sizes US Letter, A4 and A5, as 2 PDFs plus a PNG and a ZIP per the listing
- Instant download · Print at home · US Letter · A4 · A5
Use code BLOG10 for 65% OFF at Etsy checkout!
Get the Foot Reflexology Map on Etsy →
Instant download · Print at home
What the Foot Reflexology Chart Shows
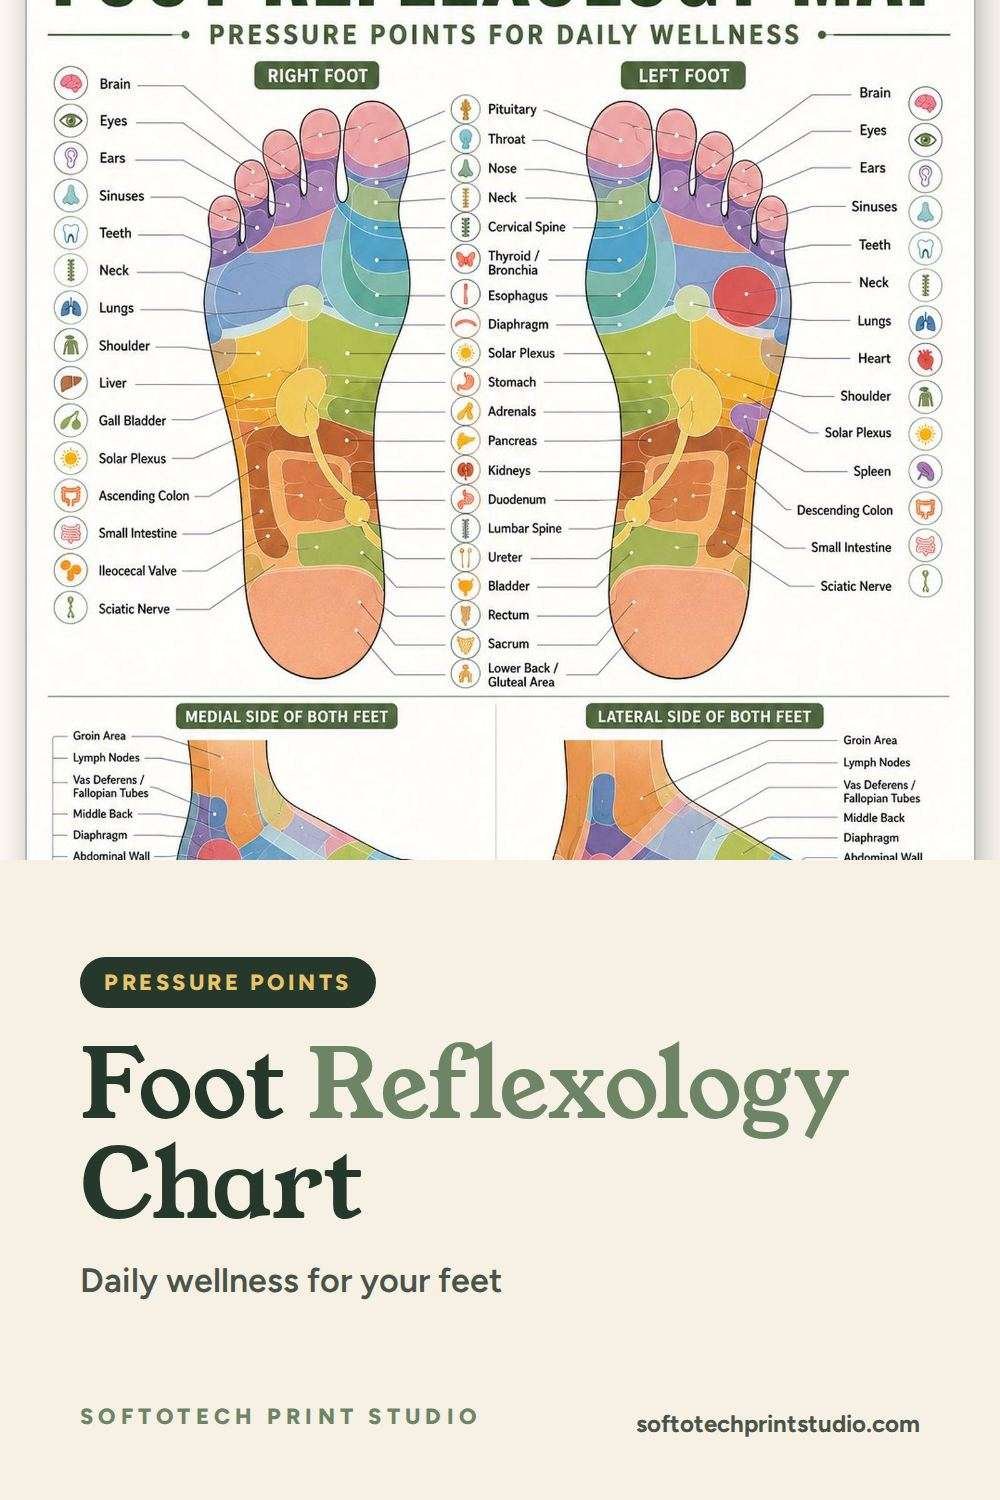
The chart is headed FOOT REFLEXOLOGY MAP, PRESSURE POINTS FOR DAILY WELLNESS, and it labels pressure points on both feet. The top map is fully legible, and this guide names only the labels on that top map. The lower side views of the feet, showing the medial and lateral sides of both feet, and the bottom strips headed How to Use, Wellness Benefits, Foot Zone Key and Self-Care Tips, were cut off or too small to read reliably on the listing view, so their detailed text is not quoted here. What follows is the map itself, the part you can read clearly.
The map has three groups of labels. The right foot carries 15 outer labels. The left foot carries 14. Down the centre, shared by both feet, there are 20 labels. That sounds like a lot to take in at once, and it is, on first look. In practice you do not need to learn them all before you start. The routine below uses the areas of the foot, heel, arch, ball, toes, top and edges, and the map tells you which named points sit in each of those areas, so you can glance at the chart while you work.
The right foot points are Brain, Eyes, Ears, Sinuses, Teeth, Neck, Lungs, Shoulder, Liver, Gall Bladder, Solar Plexus, Ascending Colon, Small Intestine, Ileocecal Valve and Sciatic Nerve. The left foot points are Brain, Eyes, Ears, Sinuses, Teeth, Neck, Lungs, Heart, Shoulder, Solar Plexus, Spleen, Descending Colon, Small Intestine and Sciatic Nerve. Most of the points match across the two feet. The differences are the ones that sit on one side only. The Liver and Gall Bladder appear on the right foot, while the Heart and Spleen appear on the left, and the colon points differ too, with the Ascending Colon on the right and the Descending Colon on the left.
| Area of the foot | What the map names there | Which foot |
|---|---|---|
| Toes and top of the foot | Brain, Eyes, Ears, Sinuses, Teeth, Neck | Both feet |
| Ball and upper sole | Lungs, Shoulder, Heart, Solar Plexus | Heart on the left only |
| Arch and mid sole | Liver, Gall Bladder, Spleen, Stomach, Pancreas, Kidneys | Liver and Gall Bladder on the right, Spleen on the left |
| Heel and lower sole | Ascending Colon, Descending Colon, Small Intestine, Bladder, Sciatic Nerve | Colon side differs left and right |
The centre points, shared by both feet, are Pituitary, Throat, Nose, Cervical Spine, Thyroid and Bronchia, Esophagus, Diaphragm, Stomach, Adrenals, Pancreas, Kidneys, Duodenum, Lumbar Spine, Ureter, Bladder, Rectum, Sacrum and Lower Back. A couple of these appear twice on the map in slightly different spots, like Neck and Solar Plexus, which show up both as centre labels and as outer labels. That is normal for a reflexology map. The points are zones rather than exact dots, and the chart places them where the area of the foot roughly lines up with the part of the body it represents. The head and neck points sit near the toes, the chest points sit across the ball of the foot, the digestive points sit through the arch, and the lower back and pelvic points sit near the heel.
It helps to print the chart and keep it where you will actually use it, on a bedside table or next to the chair where you sit in the evening. The poster prints at home in US Letter, A4 and A5 sizes, so it fits on a wall or inside a cupboard door. A quick look before you start reminds you which area you are working on, and after a few sessions you will find you need it less, because your hands start to remember the route on their own. Our seated exercises for seniors guide covers another seated routine that fits the same quiet evening slot.
How to Read the Pressure Points
Reading a reflexology map is less about memorising names and more about learning the layout of your own foot. Start at the toes. The Brain point sits at the tip of the big toe, and the Eyes, Ears, Sinuses and Teeth points sit across the other toes and the ridge just below them. The Neck point sits at the base of the toes. If you press gently along that ridge with your thumb, you are moving through the head and neck zone of the map, which is the part most people reach for first when their head feels heavy after a long day.
Move down to the ball of the foot and you are in the chest zone. The Lungs and Shoulder points sit here, along with the Heart point on the left foot and the Solar Plexus point in the centre. The Thyroid and Bronchia points and the Esophagus and Diaphragm sit just below, where the ball meets the arch. This is a broad, fleshy area, and it takes pressure well. Slow thumb circles here feel steady and grounding, which is probably why the routine below spends several steps on the ball of the foot.
The arch is the digestive zone on the map. The Stomach, Pancreas, Kidneys, Duodenum, Adrenals, Liver and Gall Bladder on the right, and the Spleen on the left, all sit through the arch. The Ascending Colon runs up the right side of the arch and the Descending Colon runs down the left. The Small Intestine sits in the middle of the sole, and the Ileocecal Valve sits low on the right foot. The arch is also the part of the foot that gets tired first when you have been on your feet all day, so it is worth taking your time here and keeping the pressure gentle rather than digging in.
The heel is the lower body zone. The Lumbar Spine, Ureter, Bladder, Rectum, Sacrum and Lower Back points sit here, along with the Sciatic Nerve point on the outer edge of each foot. The heel is a firm area, so it can take a firmer press than the arch, but the same rule applies. Press, hold, and breathe, and ease off if anything feels sharp or sore. A reflexology session should feel like a firm, pleasant pressure, never like pain. If a spot is tender, spend less time on it, not more. For more ideas on keeping the legs and feet moving gently, our mobility exercises for seniors guide is a good next read.
One last note on reading the chart. The map names points, not problems. Pressing the Liver point does not treat the liver, and pressing the Kidney point does not treat the kidneys. The names are the traditional labels of the reflexology map, and the routine is a relaxation practice. Keep that in mind and the chart stays what it is meant to be, a pleasant way to wind down and look after tired feet.

The 16 step massage routine
Foot Reflexology Massage Routine Printable
- 16 step by step self massage techniques for daily foot care, for beginners
- The routine runs heel press and hold, arch sweep, ball of foot circles, toe pull and release, instep press, ankle circle massage, sole thumb walk, outer edge press, knuckle roll, inner arch hold, toe spread and release, ball press sequence, top of foot stroke, heel squeeze, sole long stroke and a closing hold
- Timings on the chart: heel press 30 to 45 seconds, arch sweep 10 slow strokes, ball of foot circles 30 to 45 seconds, toe pull 3 to 5 times each toe, ankle circles 10 each direction, sole thumb walk 3 to 5 passes, heel squeeze 8 to 10 reps, closing hold 1 minute
- Print sizes US Letter, A4 and A5, as 2 PDFs plus a PNG and a ZIP per the listing
- Instant download · Print at home · US Letter · A4 · A5
Use code BLOG10 for 65% OFF at Etsy checkout!
Get the Foot Massage Routine on Etsy →
Instant download · Print at home
Using the Chart at Home
The best time for a foot massage session is when you are already sitting down and not in a rush. After dinner, while you watch something in the evening, or before bed, all work. Sit in a comfortable chair with one foot crossed over the opposite knee, or with the foot resting on a low stool. Keep the other foot flat on the floor so you stay steady. Wash your hands first, and if you like, rub a little unscented lotion or oil between your palms so your thumbs glide instead of dragging on the skin. Dry skin grips, and a small amount of lotion makes the thumb walking step much smoother.
Work one foot at a time, from heel to toes or toes to heel, and keep to the order on the routine chart so you do not skip a step. The routine takes about ten minutes per foot if you follow the timings, a little less if you move briskly. You do not have to do both feet every time, though most people find it feels uneven to do only one. If time is short, do the full routine on one foot and a shorter version on the other, a heel press, an arch sweep and a closing hold, and come back to the full routine the next day.
Pressure is the part people get wrong most often. Press with the pad of your thumb, not the tip, and press in until you feel a firm, dull pressure, then hold or move slowly. If your thumb gets tired, switch to the knuckles, which is exactly what step nine of the routine does. Breathe normally while you press, and let your shoulders drop. It is easy to tense up while concentrating on the foot, and the whole point of the routine is to relax, so check in with your own shoulders every few steps. If you have a partner or a family member nearby, the routine also works well done by someone else, with the same steps and the same gentle pressure.
A printed chart makes the routine easier to follow than a phone screen, because your hands are busy and you do not want to keep tapping a screen with lotion on your fingers. The two printables in this guide, the reflexology map and the 16 step routine, print in US Letter, A4 and A5 sizes, so you can keep the map on the wall and the routine on a bedside table. If you find a step you particularly like, circle it on the printed routine and spend a little longer on it next time. The chart is a guide, not a test, and the version that feels good is the one you will actually keep doing. For a gentle stretch routine for the back that often goes tight along with tired feet, our gentle stretches for sciatica guide is worth a look.
Worked Example: A 16 Step Foot Massage Session
Here is the full session, built from the 16 steps on the routine chart, in chart order, with the pressure points from the map named at each step where they match. Set aside about ten minutes for one foot. Sit comfortably, lotion on your hands, chart where you can see it, and work through the steps in order.
Steps 1 to 4 work the heel, arch and toes. Step 1, Heel Press and Hold, runs 30 to 45 seconds. Press both thumbs into the heel, where the Lumbar Spine, Bladder and Lower Back points sit, and hold. Step 2, Arch Sweep, is 10 slow strokes. Sweep your thumbs from the heel toward the ball of the foot, across the Stomach, Pancreas and Kidney points. Step 3, Ball of Foot Circles, runs 30 to 45 seconds. Make slow circles with your thumbs across the ball, over the Lungs, Shoulder and Solar Plexus points. Step 4, Toe Pull and Release, is 3 to 5 times on each toe. Hold each toe gently at the base, pull it softly outward, and release. This works the Brain, Eyes, Ears, Sinuses and Teeth points at the tips of the toes.
Steps 5 to 8 move to the instep, ankle and sole. Step 5, Instep Press, runs 30 to 45 seconds. Press along the inner edge of the foot, where the spine points run on the map. Step 6, Ankle Circle Massage, is 10 circles in each direction. Cup the ankle with one hand and circle it slowly, first one way and then the other. Step 7, Sole Thumb Walk, is 3 to 5 passes. Walk your thumbs in small steps across the whole sole, from heel to toes, covering the Small Intestine and the colon points as you go. Step 8, Outer Edge Press, is 10 slow presses. Press along the outer edge of the foot, where the Sciatic Nerve point sits.
Steps 9 to 12 use the knuckles and the arches. Step 9, Knuckle Roll, runs 30 to 45 seconds. Make a loose fist and roll your knuckles slowly across the sole, which gives your thumbs a rest. Step 10, Inner Arch Hold, runs 30 to 45 seconds. Press your thumbs into the inner arch and hold, over the digestive points on the map. Step 11, Toe Spread and Release, is 3 to 5 times. Spread the toes apart gently with your fingers and let them spring back. Step 12, Ball Press Sequence, is 10 slow presses. Press across the ball of the foot one spot at a time, from the inner edge to the outer edge.
Steps 13 to 16 finish the session. Step 13, Top of Foot Stroke, is 10 slow strokes. Stroke from the ankle toward the toes across the top of the foot, where the foot meets the leg. Step 14, Heel Squeeze, is 8 to 10 reps. Cup the heel in your palm and squeeze gently, then release. Step 15, Sole Long Stroke, is 10 slow strokes. Run your palm or your thumbs in one long stroke from heel to toes, smoothing out the whole sole. Step 16, Closing Hold, runs 1 minute. Hold the foot in both hands, one hand on top and one underneath, and just hold it still. Breathe slowly, let the foot rest, and then switch to the other foot and start again at step 1.
After the session, sit for a minute before you stand up. Your feet will feel warm and a little tingly, and standing up too fast after ten minutes of sitting can make you wobbly. Put on a pair of soft socks, have a glass of water, and note on the printed chart which steps felt best. Next time, you can linger on those steps and move a little faster through the ones that felt ordinary. The routine is yours to shape once you know the order, and the chart stays on the wall for the days when you want to follow it exactly.
Frequently Asked Questions
What is a foot reflexology chart?
A foot reflexology chart is a map that labels pressure points across both feet, with names like Brain, Lungs, Solar Plexus, Liver, Kidneys and Sciatic Nerve placed where each zone sits on the foot. The chart in this guide labels 15 points on the right foot, 14 on the left, and 20 centre points shared by both feet. It is used as a guide for a gentle self massage routine, not as a diagnosis tool.
How long does the 16 step foot massage routine take?
About ten minutes per foot if you follow the timings on the chart. Most steps run 30 to 45 seconds or 10 slow strokes, the toe steps run 3 to 5 times each, and the session ends with a 1 minute closing hold. You can do one foot when time is short, but doing both feels more even.
Does reflexology treat health conditions?
No, not as this guide presents it. Reflexology is a relaxation and self care practice, and this guide makes no treatment claim for any condition. The point names on the map are traditional labels, and the routine is a calming way to look after tired feet. If you have a foot injury, diabetes, poor circulation, or a condition that makes your feet sore, check with your doctor first.
Which points are different on the left and right foot?
Most points match on both feet, but a few sit on one side only. The Liver and Gall Bladder appear on the right foot, while the Heart and Spleen appear on the left. The colon points differ too, with the Ascending Colon on the right foot and the Descending Colon on the left. The centre points, like Stomach, Pancreas and Kidneys, are shared by both feet.
What size are the printable foot reflexology charts?
Both SoftoTech Print Studio charts in this guide print at home in US Letter, A4 and A5 sizes, as 2 PDFs plus a PNG and a ZIP per the listing. The map shows the pressure points on both feet, and the routine chart shows all 16 steps with their timings, so you can keep them together by your chair.
This guide is for general wellness and is not medical advice. Check with your doctor before starting a new routine.
Feet need movement as well as massage: our plantar fasciitis exercises guide covers 16 stretches and strength moves, from towel pulls to marble pickups.
Related Guides
- Ankle Strengthening Exercises for Seniors
- Seated Exercises for Seniors
- Mobility Exercises for Seniors
- Gentle Stretches for Sciatica
Sources
Sources: Cleveland Clinic: Reflexology, National Center for Complementary and Integrative Health: Massage Therapy