
Knee strengthening exercises are not about pushing through pain. They are about building the muscles around the knee so the joint has support, and doing it gently, at home, with no equipment. The chart in this guide lists 16 gentle movements for strong and stable knees, with reps and holds printed on it. This guide walks through the first 12 in order, with the reps as printed, and it names the last four by title only, because their reps were cut off on the chart.
Knees take a lot of load every day. Walking, stairs, standing up from a chair, carrying shopping. The muscles that support the knee are the quadriceps at the front of the thigh, the hamstrings at the back, the glutes, and the calves. When those muscles are weak, the knee does more of the work itself. When they are stronger, the knee shares the load. That is the whole idea behind this routine, and it is why the moves are gentle rather than hard.
One honest note before we start. The last four moves on the chart are Seated Leg Extension, Heel Raises, Hamstring Curl and Step Touch. Their reps were cut off, so this guide names them by title only and never states their reps. The second box is a sciatica pain relief chart, and its title says 16 exercises but the chart shows only 12 numbered exercises, so this guide never claims 16 for that chart. This is a general knee strengthening routine for adults, distinct from the seniors knee exercises post already live on this site. It does not claim to be seniors only, and it does not promise any outcome. If a move hurts, stop it and check with a doctor or physiotherapist. For a related routine for older readers, our knee exercises for seniors guide covers a gentler set.
In this guide:
- The 16 Moves on the Chart
- Worked Session: The 12 Moves in Order
- A Weekly Schedule: 3 Sessions a Week
- Form, Pain and When to Stop
- Frequently Asked Questions

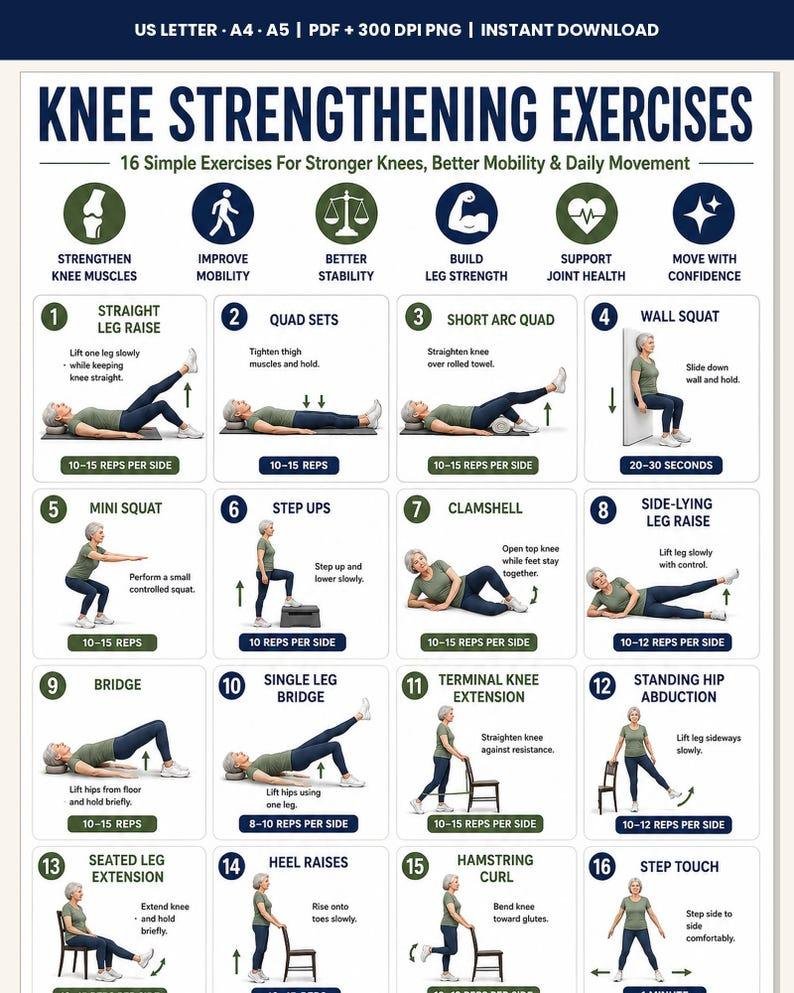
- 16 gentle movements for strong and stable knees, with reps and holds printed on the chart
- The first 12 moves in chart order: Straight Leg Raise 10-15 reps per side, Quad Sets 10-15 reps, Short Arc Quad 10-15 reps per side, Wall Squat 20-30 seconds, Mini Squat 10-15 reps, Step Ups 10 reps per side
- Clamshell 10-15 reps per side, Side-Lying Leg Raise 10-12 reps per side, Bridge 10-15 reps, Single Leg Bridge 8-10 reps per side, Terminal Knee Extension 10-15 reps per side, Standing Hip Abduction 10-12 reps per side
- The last four moves are Seated Leg Extension, Heel Raises, Hamstring Curl and Step Touch; their reps were cut off on the chart, so they are named by title only
- Print sizes US Letter, A4 and A5, as 3 PDFs plus a PNG and a ZIP per the listing
- Instant download · Print at home · US Letter · A4 · A5
Use code BLOG10 for 65% OFF at Etsy checkout!
The 16 Moves on the Chart
The chart lists 16 gentle movements, and the first 12 have reps and holds printed clearly. Move 1 is Straight Leg Raise, 10 to 15 reps per side. Lie on your back, one knee bent, the other leg straight, and lift the straight leg to the height of the bent knee. It works the quadriceps without bending the knee much, which is why it comes first. Move 2 is Quad Sets, 10 to 15 reps. Sit or lie with the leg straight, tighten the thigh muscle and press the back of the knee down, hold briefly, then release. It looks like nothing, and it is one of the most useful moves on the chart.
Move 3 is Short Arc Quad, 10 to 15 reps per side. Lie with a rolled towel under the knee, straighten the leg until it is level, then lower it slowly. The towel gives the knee a small range to work in, which is kinder than a full straightening from flat. Move 4 is Wall Squat, 20 to 30 seconds. Stand with your back to a wall, slide down a short way, hold, then slide back up. Do not go deep. A shallow hold is enough, and it is safer than a deep squat when knees are unhappy.
Move 5 is Mini Squat, 10 to 15 reps. Stand with feet shoulder width apart, bend the knees a little, then stand back up. Mini means mini. A small bend, done with control, builds strength without loading the joint hard. Move 6 is Step Ups, 10 reps per side. Step onto a low step with one foot, bring the other foot up, then step back down in control. Use a low step, hold a rail or a chair if you need to, and keep the knee tracking over the toes.
Move 7 is Clamshell, 10 to 15 reps per side. Lie on your side, knees bent, feet together, and open the top knee like a clamshell, then close it slowly. It works the glutes, and strong glutes help the knee track properly. Move 8 is Side Lying Leg Raise, 10 to 12 reps per side. Lie on your side, legs straight, and lift the top leg, then lower it slowly. It works the hip muscles, which support the knee from above.
Move 9 is Bridge, 10 to 15 reps. Lie on your back, knees bent, feet flat, and lift your hips until your body makes a straight line from shoulders to knees, then lower slowly. It works the glutes and hamstrings, and it is a good move to finish the lying section. Move 10 is Single Leg Bridge, 8 to 10 reps per side. Same as a bridge, but one leg lifted, so one side works harder. Do this one only when the two leg bridge feels easy.
Move 11 is Terminal Knee Extension, 10 to 15 reps per side. Sit with a band or a towel behind the knee, straighten the leg against the resistance, then lower slowly. The last bit of straightening is the part this move targets, and it is the part that often feels weakest. Move 12 is Standing Hip Abduction, 10 to 12 reps per side. Stand, hold a chair, and lift one leg out to the side, then lower it slowly. It works the hip muscles that keep the knee steady when you walk.
The last four moves are Seated Leg Extension, Heel Raises, Hamstring Curl and Step Touch. Their reps were cut off on the chart, so they are named by title only in this guide. That is not a gap to fill by guessing. It is a limit of the chart as printed, and this guide respects it. If you want those four, print the chart and follow the titles as a reminder, but do not take a rep count from this guide, because the chart does not give one. Our leg exercises for seniors guide covers a different set of leg moves, with its own reps as printed.
| Move | Reps or hold, as printed | What it works |
|---|---|---|
| Straight Leg Raise | 10-15 reps per side | Quadriceps |
| Quad Sets | 10-15 reps | Quadriceps, knee control |
| Short Arc Quad | 10-15 reps per side | Quadriceps, small range |
| Wall Squat | 20-30 seconds | Quadriceps, glutes |
| Mini Squat | 10-15 reps | Quadriceps, glutes |
| Step Ups | 10 reps per side | Legs, balance |
| Clamshell | 10-15 reps per side | Glutes |
| Side-Lying Leg Raise | 10-12 reps per side | Hip muscles |
| Bridge | 10-15 reps | Glutes, hamstrings |
| Single Leg Bridge | 8-10 reps per side | Glutes, hamstrings, one side |
| Terminal Knee Extension | 10-15 reps per side | Quadriceps, end range |
| Standing Hip Abduction | 10-12 reps per side | Hip muscles, knee stability |
Read the table as a routine, not as a race. The reps are ranges, not targets to hit on day one. Start at the low end, 10 reps where the chart says 10 to 15, 8 reps where it says 8 to 10, and build up only when the low end feels easy. A move done slowly and well beats a move done fast and sloppy, every time.
Worked Session: The 12 Moves in Order
Here is a worked session built from the first 12 moves in chart order, with reps and holds as printed. It takes about 20 to 25 minutes, and it follows the chart order because the chart order makes sense: lying moves first, then seated and wall moves, then standing moves last. Start on the floor, finish on your feet, and rest between moves when you need to.
Begin lying down. Straight Leg Raise, 10 to 15 reps per side. Do the left leg first, then the right, and rest for a few breaths between sides. Quad Sets, 10 to 15 reps. Tighten, hold for a slow count, release. Short Arc Quad, 10 to 15 reps per side, with a rolled towel under the knee. These three moves warm the quadriceps up without asking the knee to bend far, and they are a good test. If they feel fine, keep going. If one hurts, skip it and come back to it another day.
Move to the wall and the chair. Wall Squat, 20 to 30 seconds. Slide down a short way, hold, breathe, slide back up. Rest, then repeat if you want a second hold, but the chart gives a hold, not a rep count, so one good hold is the session. Mini Squat, 10 to 15 reps. Small bend, stand up tall, repeat slowly. Step Ups, 10 reps per side, on a low step, holding a rail if you need it. Step up, step down, switch sides. Keep the movement slow on the way down, because the lowering part is where the strength builds.
Back to the floor for the hip and glute work. Clamshell, 10 to 15 reps per side. Lie on your side, knees bent, feet together, open and close slowly. Side Lying Leg Raise, 10 to 12 reps per side. Straight legs, lift and lower with control. Bridge, 10 to 15 reps. Lift the hips, hold for a breath, lower slowly. Single Leg Bridge, 8 to 10 reps per side, only if the two leg bridge felt easy. This is the hardest move in the set, so do not rush into it on the first week.
Finish standing. Terminal Knee Extension, 10 to 15 reps per side, seated with a band or towel behind the knee, straightening against gentle resistance. Standing Hip Abduction, 10 to 12 reps per side, holding a chair, lifting one leg out to the side. End with a short walk around the room, and a few slow breaths. The session is done. You have worked the quadriceps, hamstrings, glutes and hip muscles, in chart order, with the reps as printed.
Do the session in order the first few times, so you learn the flow. After that, you can split it if you like: lying moves in the morning, standing moves in the evening, or the whole set in one go three times a week. The chart does not set a session length, so this guide does not invent one. The time above is a rough guide based on the reps, not a promise. Take the rests you need, drink water, and stop if pain shows up. Our seated leg exercises for seniors with bad knees guide shows a seated only version for readers who prefer to stay in a chair.

- A low impact stretch routine for lower back and sciatic nerve pain relief, in the same workout family
- The chart shows 12 numbered exercises, not 16 as the title says, and this guide says so plainly
- Moves include Knee-to-Chest Stretch 20-30 seconds each side, Piriformis Stretch 20-30 seconds each side, Seated Spinal Twist 20-30 seconds each side, Child’s Pose 20-30 seconds, Cat-Cow Stretch 8-10 reps and Cobra Stretch 15-20 seconds
- The last four moves are Seated Nerve Glide, Pelvic Tilt, Step-Ups and Bird Dog; their details were cut off on the chart, so they are named by title only
- Print sizes US Letter and A4, as 2 PDFs per the listing (the listing does not state A5, PNG or ZIP)
- Instant download · Print at home · US Letter · A4
Use code BLOG10 for 65% OFF at Etsy checkout!
A Weekly Schedule: 3 Sessions a Week
Do this routine 3 sessions a week, with a rest day between sessions. Monday, Wednesday and Friday is the classic pattern, and it works because muscles need a day to recover between sessions. A rest day does not mean a lazy day. Walk, stretch gently, and do the things you normally do. It just means no knee strengthening session that day.
Week 1 is for learning the moves. Do each move at the low end of its rep range, 10 reps where the chart says 10 to 15, 8 reps where it says 8 to 10, and one wall squat hold of 20 seconds. Rest as much as you need between moves. The goal in week 1 is to learn the form, not to feel tired. If a move feels awkward, do it slowly in front of a mirror, or ask someone to watch your knee and tell you if it wobbles.
Week 2 is for building a little. If week 1 felt easy, add a few reps, moving toward the high end of the range. 12 reps where the chart says 10 to 15, 10 reps where it says 8 to 10, and a wall squat hold of 25 seconds. Keep the form the same. Faster is not better. Slower, with control, is better. If a move starts to hurt when you add reps, drop back to the low end and stay there for another week.
Week 3 and beyond is for steady practice. Use the full rep range as printed, and repeat the session 3 times a week. After a month, the routine should feel familiar, and the moves should feel smoother than they did on day one. That is progress, even if no number has changed. Strength builds slowly, and a routine you actually do three times a week beats a harder routine you quit after a week.
Keep the printed chart where you exercise. Tick off the moves as you do them, and write the date on the chart each session. A chart with dates on it is a record, and a record shows you that you showed up. If you miss a session, do not double up the next day. Just do the next session on its normal day. Consistency matters more than catching up. The second box below, the sciatica pain relief chart, is a different routine for lower back and sciatic nerve pain, and it is here because it sits in the same workout family, not because it is part of this knee session.
That second chart needs a clear note. Its title says 16 sciatica exercises, but the chart shows only 12 numbered exercises, and this guide says so plainly. The 12 are knee to chest stretch, double knee to chest, piriformis stretch, seated spinal twist, child’s pose, cat cow stretch, cobra stretch, standing hamstring stretch, and then seated nerve glide, pelvic tilt, step ups and bird dog, whose details were cut off on the chart. The moves with times are knee to chest stretch 20 to 30 seconds each side, piriformis stretch 20 to 30 seconds each side, seated spinal twist 20 to 30 seconds each side, child’s pose 20 to 30 seconds, cat cow stretch 8 to 10 reps, and cobra stretch 15 to 20 seconds. Do not use that chart as a knee routine. Use it, if it fits, as a separate low impact stretch routine for the lower back, and check with a doctor or physiotherapist first if you have sciatica.
Form, Pain and When to Stop
Form is simple to say and hard to do. Move slowly. Keep the knee in line with the toes, not collapsing inward. Breathe normally, do not hold your breath. Stop the range where it feels controlled, not where it hurts. If a move causes sharp pain, swelling, clicking with pain, or a feeling that the knee might give way, stop that move and check with a doctor or physiotherapist. Muscle effort is normal. Sharp pain is not.
A little ache the next day is normal when you start a new routine. It should fade in a day or two. Pain that lasts longer, swelling that does not settle, or pain that gets worse week by week is a sign to stop and get advice. This guide is general information for adults building knee strength at home. It is not a diagnosis, it is not a treatment plan, and it does not replace a physiotherapist who can watch you move and adjust the routine to your knee.
A few practical tips help. Wear shoes with a flat sole, or go barefoot on a mat if that feels stable. Use a chair or a wall for balance on standing moves, and do not be shy about holding on. A hand on a chair is not cheating. It is good sense. Use a low step for step ups, not a high one. A low step done well builds more strength than a high step done badly. Keep water nearby, and keep the session short enough that you finish feeling like you could do a little more. That is the right finish.
Finally, remember what this routine is and what it is not. It is a general knee strengthening routine for adults, with 16 gentle movements, the first 12 with reps as printed, and the last four named by title only. It is distinct from the seniors knee exercises post already live on this site, and it does not claim to be seniors only. It does not promise stronger knees in a set number of days, and it does not promise pain will go away. It gives you a printed chart, a worked session, and a weekly schedule, and it leaves the medical decisions to you and your care team. Our ankle strengthening exercises for seniors guide covers the joint below the knee, which also supports how you walk.
Frequently Asked Questions
What are knee strengthening exercises?
Knee strengthening exercises are gentle moves that build the muscles around the knee, mainly the quadriceps, hamstrings, glutes and hip muscles, so the joint has more support. The chart in this guide lists 16 gentle movements for strong and stable knees, with reps and holds printed on it. The first 12 moves have reps as printed, and the last four are named by title only because their reps were cut off on the chart.
How often should I do knee strengthening exercises?
Do this routine 3 sessions a week, with a rest day between sessions, for example Monday, Wednesday and Friday. Start at the low end of each rep range in week 1, build toward the high end in week 2 if it feels easy, and use the full range from week 3 onward. If you miss a session, do the next one on its normal day instead of doubling up.
What are the first 12 knee strengthening exercises on the chart?
The first 12 moves in chart order are Straight Leg Raise 10 to 15 reps per side, Quad Sets 10 to 15 reps, Short Arc Quad 10 to 15 reps per side, Wall Squat 20 to 30 seconds, Mini Squat 10 to 15 reps, Step Ups 10 reps per side, Clamshell 10 to 15 reps per side, Side-Lying Leg Raise 10 to 12 reps per side, Bridge 10 to 15 reps, Single Leg Bridge 8 to 10 reps per side, Terminal Knee Extension 10 to 15 reps per side, and Standing Hip Abduction 10 to 12 reps per side.
What are the last four moves on the knee chart?
The last four moves are Seated Leg Extension, Heel Raises, Hamstring Curl and Step Touch. Their reps were cut off on the chart, so this guide names them by title only and never states their reps. Do not take a rep count for these four from this guide, because the chart does not give one.
What sizes does the knee strengthening chart print in?
The Knee Strengthening Exercises Printable Chart from SoftoTech Print Studio is an instant download that prints at home in US Letter, A4 and A5 sizes, as 3 PDFs plus a PNG and a ZIP per the listing. The sciatica pain relief chart in the second box prints in US Letter and A4 sizes, as 2 PDFs per the listing, and the listing does not state A5, PNG or ZIP for that chart.
This guide is for general wellness and is not medical advice. Check with your doctor before starting a new routine.
Related Guides
- Knee Exercises for Seniors
- Leg Exercises for Seniors
- Seated Leg Exercises for Seniors with Bad Knees
- Ankle Strengthening Exercises for Seniors
Sources
Sources: American Academy of Orthopaedic Surgeons, OrthoInfo, Mayo Clinic: Knee Pain
 Home WorkoutsWorkout Plan for Women Over 50: A Gentle 28 Day Start, Then a Weekly Plan for Strength, Balance and Walking
 Home WorkoutsFace Yoga for Jowls: A 10 Minute Jaw and Neck Routine From a 12 Exercise Chart, With Honest Expectations
 Home WorkoutsMilitary Workout Routine: A 3 Level Bodyweight Plan From Beginner to Advanced, With a Weekly Schedule